GROK: How to Create a New Article
Create a New Article
NOTE: Please read carefully.
1. Log in to GROK. (grok.lsu.edu)
2. Click the Edit link in the top right hand corner of Grok.
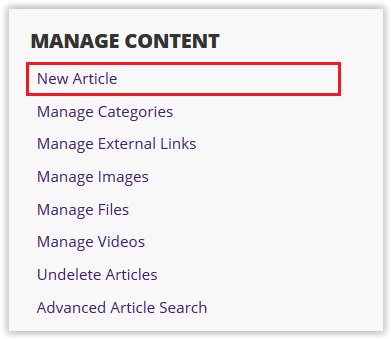
3. Click New Article, located under Manage Content. (You must be logged in to create a New Article.)

NOTE: For more information on how to use the editor, visit the GROK: Editor article.
4. A blank Article will display.

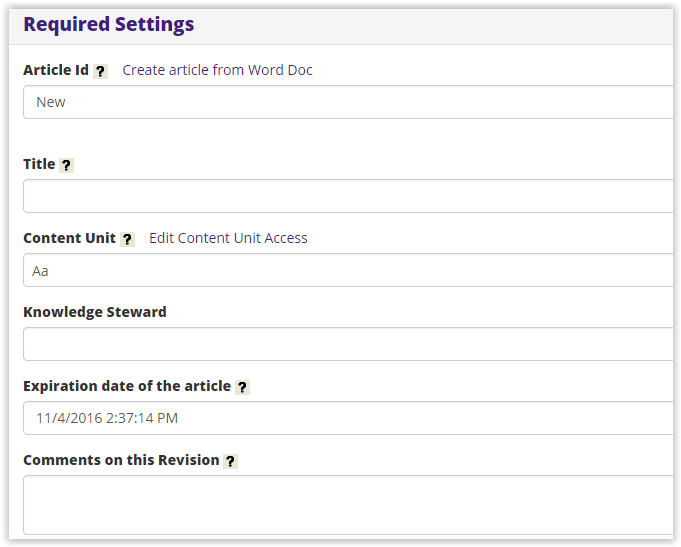
Required Settings
- Article ID: GROK Article IDs are automatically generated for each new Article.
- Title: Give your article a Title. Keep in mind that many users try the search feature first, so your article's title should clearly state its subject and purpose. We suggest you write the subject theme, then a colon, then a brief topic the article covers.
- Content Unit: Select the appropriate Content Unit under which to enter the article. (You will only see the Content Units that you have permission to.)
- Expiration Date of the Article: Set the expiration date for the Article. The default expiration date is one year from the article's creation date. You can set the article to expire before a year passes, but you cannot set an expiration date more than one year in the future.
- Comment on this Revision: This field provides a way for every article change to be documented & explained.
Optional Settings
- How Public is this Article:
- Checking the Anonymous users can read this article box means that anyone who views the public site will be able to read the article.
- Checking the All authenticated users can read this article means that users will have to log in to read the article.
- Checking Secured SSL Connection provides increased security by encrypting the contents in transit and validating the server to the end user. This should be checked for any article that contains sensitive information.
- For more information on Public vs. Private articles, see GROK Article 6362.
- Archive this Article: Checking this box will send the article to the archives. It will still be searchable, however will no longer expire annually.
- Search Settings: Checking Allow this article to be searched for is set by default so that all GROK articles can be searched for. Removing this setting will keep an Article from appearing in the search feature.
- Redirect Settings: Checking This article should redirect to another Article means that when you click on this article in the search feature, the article will forward to the identified Article ID.
Article Revision Notes
- Article Notes: This field is for important notes on the article. These notes will appear at the top of the article every time it is viewed.
- Comments on this Revision: This field should be filled out every time an article is significantly changed from its current version. It should briefly explain the changes to the article.
Categories
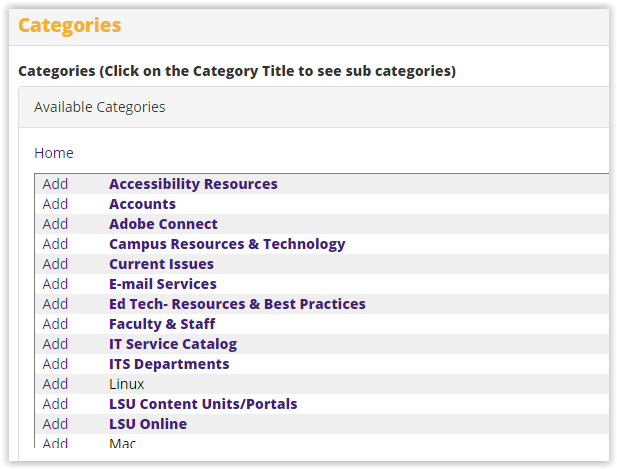
- Categories: Choose a category to add the article to, and click Add Category to Article. The categories are listed in the way they appear on the public interface on GROK. To add multiple categories, highlight the ones you want while holding the CTRL button down. To remove categories, click the category under Article's Category Classifications and select Remove Category from Article.
NOTE: For more information on Categories, click GROK Article 6361.

- Save As Draft: To save a draft version of your Article, click Save As Draft. (The Article will then appear in your Pending Articles work queue.)
- Submit for Approval: When complete, click Submit for Approval. (The article will then appear in the Work Queue to be reviewed by an administrator.)
Clone a New Article
1. Log in to GROK. (grok.lsu.edu)
2. Click the Edit link in the top right hand corner of Grok.
3. In the article you want to clone, click Edit Article Properties.
4. On the Edit screen, click the Article dropdown at the top, then choose From This Revision.
5. Return to step 4 of Create a New Article above, however keep in mind you need to change the title of the article before continuing, and click Save as Draft to assign it a new article number and avoid losing work.
13226
7/7/2025 1:16:06 PM