A workshop is an activity in which students can assess each others' submissions before an optional final assessment by the instructor. The settings for this activity determine several factors: when phases begin and end, how each phase is graded, submission and assessment requirements, and so on. There are two stages to the workshop setup: editing settings and editing the phases table.
The following is a general overview how instructors can use these settings in both of these stages to better facilitate student engagement. For an explanation of the workshop phases, see MoodleDocs: Using Workshop. For a bit more information on what happens in these phases and how the settings determine the events, see MoodleDocs: Workshop quick guide. For a very detailed explanation of each of the settings below, see MoodleDocs: Workshop settings.
For instructions on how to add a workshop, see the Workshop Overview.
Stage 1: Editing Workshop Settings
The following settings are located on the screen "Updating Workshop" after clicking the editing pencil icon.

Name and Description
At the top of the settings page, the instructor must enter a name and may provide an optional description or prompt for the workshop. Best practice is to provide an explanation in the description area of the steps student will take through the peer review process. This is also a good opportunity to include expectations or example submissions. To help students even further, attach a guide or checklist to help them through the peer review process.
Grading Settings
In this section, instructors can choose from the following options:
- Grading strategy: The grading strategy determines how graders will be able to give feedback to students. This setting works in tandem with the assessment form, which is created during the setup phase (see below). There are four options:
- Accumulative grading: Each criterion or aspect (specified on the assessment form) will include a numeric grade and optional feedback comments and weighting. A grade is calculated based on these criteria.
- Comments: Only feedback comments can be provided during assessment. No numeric grade is given or recorded until the grading phase.
- Number of errors: Each criterion on the assessment form receives a pass or fail. Graders can also leave feedback comments.
- Rubric: Instructor can create a rubric that is displayed to students. A numeric grade is generated depending on what graders select in the rubric. Note: To add more levels to your rubric, save the form and when you edit again, a new field will be available.
- Grade for submission: This sets the maximum grade a student can obtain for submitted work.
- Submission grade to pass: This setting determines the minimum grade required to pass. The value is used in conditional release and course completion and in the gradebook.
- Grade for assessment: This sets the maximum grade a student can obtain for assessing other students' submissions. The maximum grade for the entire workshop is the submission score + the assessment score.
- Assessment grade to pass: This setting determines the minimum grade required to pass. The value is used in a conditional release and course completion and in the gradebook.
- Decimal places in grades: This specifies how many decimals places the grades will display. The default is 2.
Submission Settings
In this section, instructors specify requirements for submissions. Best practice is to provide instructions specific to submission, such as accepted file types or number of files allowed. Instructors can also specify what type of submission is required, change the maximum number of attachments, select the file formats accepted, change the maximum attachment size, and allow late submissions. If late submissions are allowed, work may be submitted after the submission deadline or during the assessment phase. Late submissions cannot be edited by the student.
Assessment Settings
In this section, instructors can provide instructions for the assessment phase or enable self-assessment. Best practice is to include instructions that explain the assessment process, especially if students are expected to follow a specific set of guidelines.
Note that if self-assessment is enabled, students may receive their own work when submissions are allocated. To avoid this, leave this option un-checked.
Feedback
Feedback settings determine whether reviewers can leave feedback comments or attach files. This feedback may be optional or required depending on the selected feedback mode. If enabled, a text field appears at the bottom of the assessment form. Reviewers can leave an overall assessment of the submission or provide additional explanation of their assessment. If feedback files are allowed, file formats, file size, and number of files accepted per submission can be determined here.
This section also includes a Conclusion text box, the contents of which are displayed to participants at the end of the submission and assessment phases. This area could be used to provide follow-up instructions or next steps for students once the assessments are complete.
Example Submissions
If enabled, instructors can provide one or more example submissions to give students practice before assessing a peer's work. Assessment of the example submission can be set to voluntary or mandatory either before or after the student's initial submission of their own work.
Availability
This section of the settings is important for setting the workshop to a closed schedule or making it an open-ended activity. Opening the workshop at a specific time but leaving the deadline open will make it an ongoing activity. The instructor can set the open and close dates and times for each phase of the workshop, although the phases must still be switched manually. One exception is that the workshop can be moved into the assessment phase automatically, after the deadline of the submissions phase, if the instructor selects this checkbox. If this automatic switch to the next phase is enabled, assessments can begin as soon as submissions are closed. This option is only available if a deadline has been selected for submissions.
Note: If the workshop is set to automatically move into the assessment phase, it is recommended to set up the scheduled allocation method (see below). If the submissions are not allocated, no assessment can be done even if the workshop itself is in the assessment phase.
See the section on phases below for more information about moving between the phases.
Common Module Settings
These settings specify the visibility of the workshop for students (Hide/Show/Stealth) and the group mode and group/grouping restrictions. For information on setting up groups, see How to Create Groups. For help with groupings, see How to Create Groupings.
Restrict Access
For information about setting restrictions, see Conditional Release and Restricting Access to Materials.
Activity Completion Settings
By default, students can manually mark the workshop as complete, but an instructor can change this setting. For help with activity completion, see Conditional Release and Restricting Access to Materials.
Tags Settings
Tags are keywords that can be added to an activity or resource to improve the functionality of the Search feature at the top of the course.
Stage 2: Editing the Phases Table
After saving the settings listed above, an instructor can now access and edit the settings in the phases table. If Save and display was selected, the table automatically appears at the top of the submission screen. If Save and return to course was selected, the table can be reached by clicking on the workshop activity to reach the submission screen.
The phases table shows five stages of work involving both instructors and students: setup, submission, assessment, grading evaluation, and close. Students will not see text in columns for phases that are not currently open. Items that need to be completed are marked with a red "x," completed items are marked with a check, and information is indicated with a circled lowercase "i."
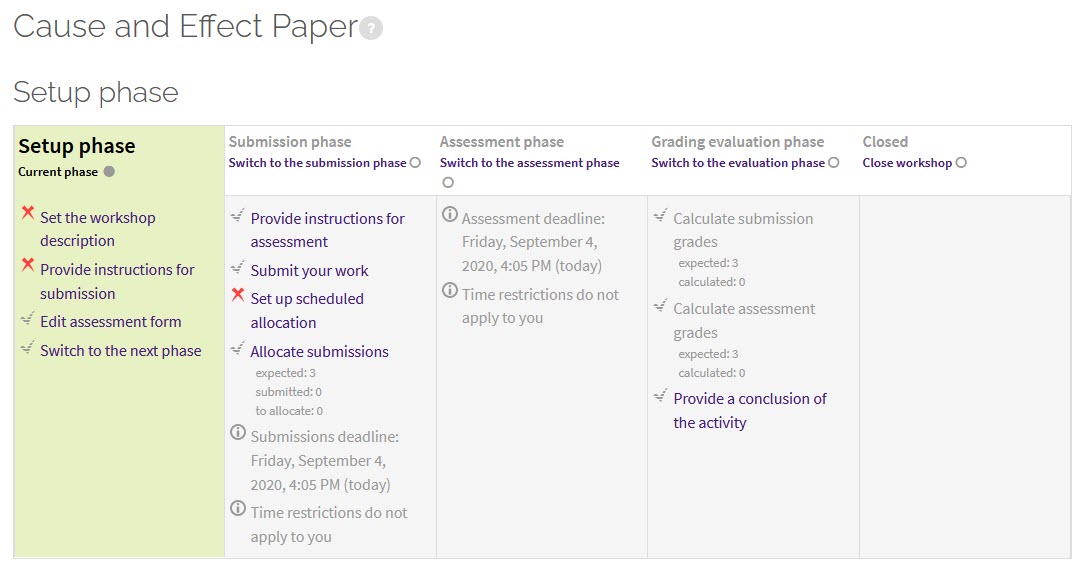
All possible tasks are hyperlinked for easy access to settings. At the top of each column, the instructor must manually shift the workshop into the next phase by clicking directly under the column header. The exception is the assessment phase, which can be set to switch automatically. If this was not selected in general settings, the instructor must manually shift into this phase also. This manual shifting means that students cannot submit until the instructor has switched from setup, even if the open date has passed. The open and close dates simply provide a window within which students can submit or assess as long as the phase has started.
To give students a guide for providing feedback during the assessment phase, fill out the assessment form. Click Edit assessment form in the Setup phase column. On this page, you can provide criteria or aspects for students to evaluate and how each aspect will be graded. Each aspect can also be weighted, which will be calculated when the assessment is completed.
It is also important to set up submission allocation so that students receive submissions to assess. To set up scheduled (automatic) allocation, click either of the two allocation links. Then, enable the allocation and save. The workshop will automatically allocate submissions at the end of the submission phase. To manually allocate submissions or enable random allocation, select Allocate submissions. Note that to use random allocation in visible or separate groups modes, the participants must be part of at least one group.
For more information about workshop phases, see MoodleDocs: Using Workshop.
Resources
For more information on workshop, read the following documentation from Moodle Docs. Note that the documentation does not show the SNAP Theme, but the functionality of the settings is the same. All links will open in a new window.