In Moodle, several types of files can be uploaded directly into a course as a standalone resource, including word-processed documents, slideshow presentations, and PDFs. Files may be added by uploading from an external source, such as computer or USB drive, or by dragging and dropping directly onto the course page.
Note: You cannot add folders through the methods listed below. Instead, create a Folder resource in your course and add files to it. See GROK article 20196, Folder Resource.
Drag and Drop Files Into Your Course
1. In your Moodle course, toggle the Edit mode to on and navigate to the section where you want to add the file.
2. Scroll to the bottom of the section until you see the area to drop files.

3. With your computer's file manager open, click and hold down the left mouse buttton or trackpad area on the file and drag it onto the course page, over the "Drop files" box. If you are doing it correctly, the cursor icon will indicate that you can copy the file to the page. Once your cursor is in the box, release the left button to drop the file into your course. Note that Moodle will automatically add the title of your file to the course, and the file will appear at the bottom of the section. You can then edit the file settings as described in the next section.
Add a File Through the File Picker
If you do not want to drag and drop your file, you can browse for the file and add it through the Moodle file picker. In the same box that says Drop files to attach or browse, click on "browse." This will automatically open the file picker so you can select your file. Again, the file will be added at the bottom of the section.
Add a File Resource Through the Activity Chooser
You can also add a file resource like you would add any other activity or resource, through the activity chooser.
1. In the course and section where you want to add a file, scroll down to the bottom to Create learning activity. Make sure you have editing toggled on.

2. Click on the File resource.
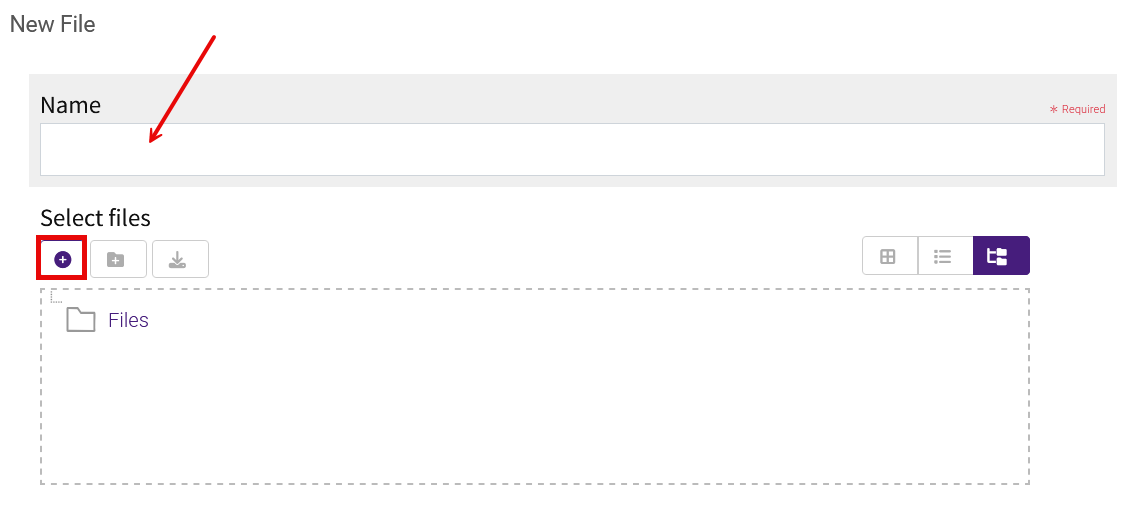
3. On the settings screen, enter a Name for the file. You can either drag and drop into the dashed box or select the file by clicking the plus icon.
NOTE: You should only add one file. To add multiple files, create a Moodle folder (see GROK article 20196, Folder Resource).
4. Set the remaining options:
- Set Visibility to show, hide, or put in stealth mode (the file will be invisible to students but can be linked in another section, resource, or activity in the course)
- Set the Appearance of the file, including the display method and what metadata to include
- Under Common module settings you can add a Description that can be displayed on the course page
- In Restrict access, the file can be restricted based on a prior activity completion, date, grade requirement, user profile fields, or a combination of nested restrictions
- In the Activity completion settings, you have the opton to add completion conditions. By default, this is set to None.
- You can add Tags, which are keywords related to the file that will appear in the course Contents search.
5. Click Save and return to course. The file will appear on the course page with to the settings you chose.