The steps below will explain how one can edit any given Grok article. If you would like to change or edit your own documentation but do not see the "Edit Article Content" button (seen below in step 4), you may need to be added as an editor.
If you'd like to be added as an editor to a given article or set of articles please email itservice@lsu.edu with the subject "Requesting Grok editor privileges". Please be sure to include any details that may be pertinent, e.g. you are a new hire and have been tasked with updating Grok documentation for your given group.
Editing an article within GROK
1. Open the GROK Knowledge Base (grok.lsu.edu).
2. Click on the Login button. This is located in the upper, right-hand corner.

3. Open the GROK Article that you need to Edit.
4. Click Edit Article Content link. This is located at the top of the article.

5. Make the necessary Changes to the content in the article in the Body text box. This is located under the Body tab.
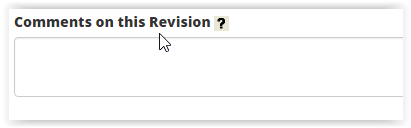
6. (Optional) If there were major changes to an article, make a Comment on the changes that you just made to the article in the Comments on this Revision text box. This is located under the Required Settings tab.
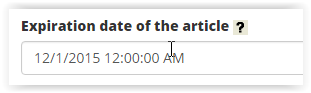
7. (Optional) Check and update the Expiration date of this article. This is located under the Required Settings tab.
NOTE: The Maximum Time Allowed is 1-YEAR Before Expiration.
-
When an Article Expires, it is placed into the Queue to be Reviewed by the Knowledge Steward of the Content Unit.
-
When an Article Expires, it is flagged as Expired in the Public View.
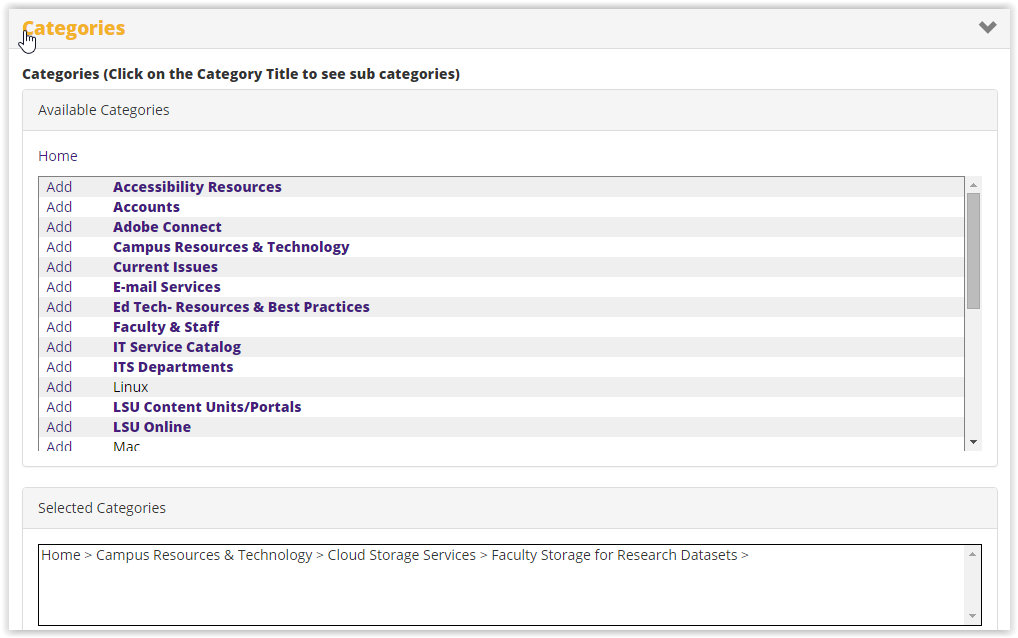
8. Check and update the Categories where this article displays. This is located under the Categories tab.
9. (Optional) Click Save As Draft if you would like to continue working on the article at another time.
- This will save the changes that you have made to the article in Your Personal GROK Queue which is located on the GROK Editor Homepage.
10. Once all changes have been made, click Submit for Approval.

Additional Options
As an advanced editor, you may need to use the following options in several cases. Some of these are only possible if you are an admin.
New Article from Existing Article
To make a new article from an existing one and keep all the text, content unit, and categories, use Article > New article from this revision from the Edit screen. Note that special view permissions/restrictions based on roles, if any, will not carry over and must be re-made.
Article Notes and Previews
- Article Notes are persistent notices that show above all other sections; sometimes used for info or edit warnings.
- Preview section is in some articles (connect to wireless, print on campus, etc) and should be updated along with main article if present. This section is to prevent Featured Articles from displaying all of their text on pages they are added to; thus only a "preview" is needed. If the article still gives you errors on a link you removed, or text you changed, check the Preview section to see if it still lingers there.
Redirect Articles
To redirect an article, check the checkbox in Optional Settings > Redirect Settings at the bottom and the page will reload. Then, enter the article you want to redirect to in the new box that has appeared. Lastly, select all text in body, delete it, and replace it with "redirect to [article ID]". The text can be recovered via the last revision in article history if needed later.
Restricting Articles
- Uncheck "Anonymous users can ready this article" box to restrict to only myLSU logins.
- Uncheck "All authenticated users can read this article" box to restrict to only AD Groups specified via Edit Article Access link just above it.
HTML Tricks
You can make Jump To links by using the Anchor feature in GROK. Make anchors in the spot before the section heading's first letter and abbreviate so that it can be understood by future editors. Then, make a "top" anchor by putting an anchor in the first character of the article (above any overview images if any). You can then make a Jump To list by adding the name of the section at the top, then adding a link via Link > Link Type > Link to anchor in the text and choosing the anchor you want to link to. The top anchor should only be shown beneath long sections and say [Return to top] italicized.
You can make collapsing sections in GROK but this should be used very sparingly. For example, we could make a collapsing menu for GROK 19929 (MFA setup) but we would need to work with the content owners, ITS Security, first before making any edits.
To make collapsing sections, use the following template in Source mode: (substitute "open" for "closed" if you want them to be closed by default; use sparingly)
<details open="">
<summary>Collapsible title here
</summary>
<p style="margin-left: 20px;">Collapsed text here
</p>
</details>
You can make scrolling subsections like the one at the bottom of 20077, but these should be used very sparingly. These are useful for when you want the content to be more visible than a collapsing section, but not sprawl the page to unreasonable lengths. These can be used a bit more than collapsing sections, but mostly for information that may not be the main focus of the article (such as archived sections).
To do this you can add this to the beginning of the section in Source mode: <div style="width:1190px;height:390px;line-height:2em;overflow:scroll;padding:3px;">
And then this at the end of the section: </div>
Admin Info
Since admins are both editors and approvers, you can click both "Submit Content" and Approve Content" when ready. It is still best practice for someone else to approve Quality in case you have typos. If you are the GROK admin, you may also opt to use LSU Grammarly for this as you are eligible due to being LSU A&M staff.