Moodle: Activities & Resources: Adding and Editing Attendance Sessions
This article has not been updated recently and may contain dated material.
Once you have added the Attendance activity to your course, you must now set up attendance sessions. You can add one session or multiple sessions at once if you will be taking attendance on a regular schedule.
Tip: Review the default Attendance Status Set before creating Attendance sessions. Any custom settings should be made prior to creating sessions to avoid affecting existing attendance or grades. See Moodle: Activities & Resources: Attendance Status.
To Add Attendance Sessions:
- In Moodle, go to the course where you have added an Attendance activity and click on the activity card.

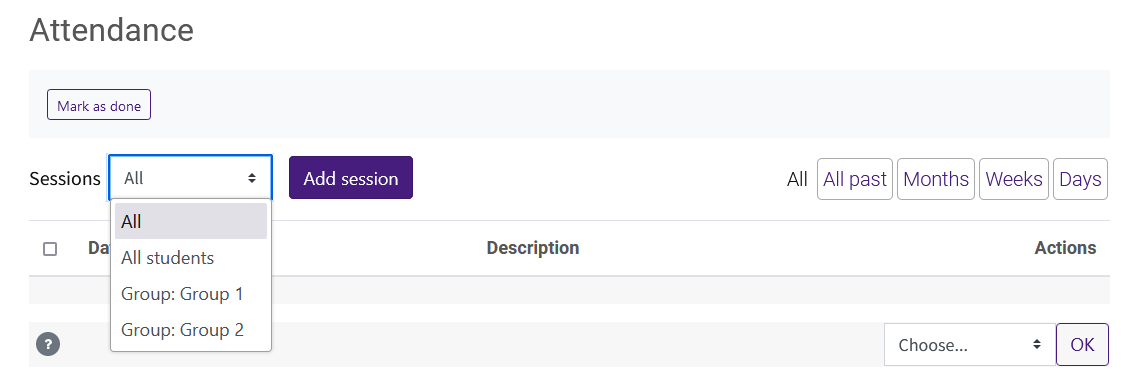
- Inside the activity, click Add session.

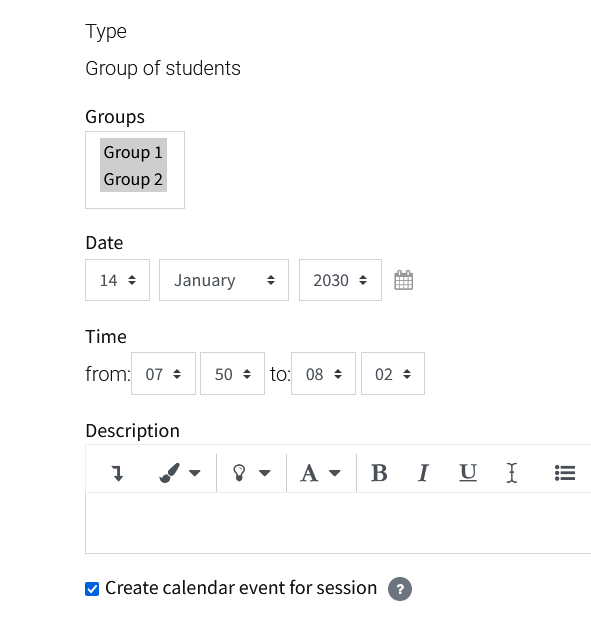
- Here you will set the settings for the session.
- Select the group or groups that will use this session from the Groups list. Select multiple groups only when their sessions are held at the same corresponding dates and times. If there are no groups present in your course, this option will not be available.
- Select a date and window of time for the session to be available. If needed, include a description to give students more information about the session.

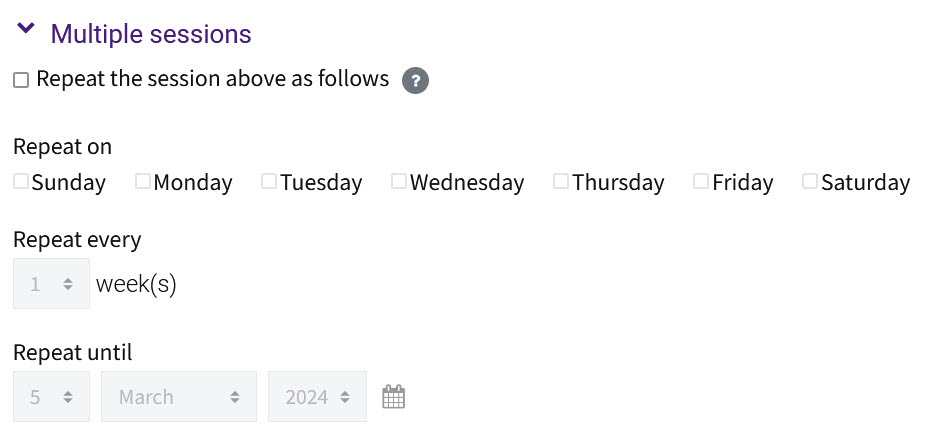
- To create multiple attendance sessions, check the box to Repeat the session above as follows. Check the Repeat on box(es) for the days the sessions should appear. For example, For Tuesday and Thursday classes, you would check both the Tuesday and the Thursday boxes. To create an attendance session every week, set the weekly repeater to repeat every one (1) week and add a Repeat until date to set an end date.

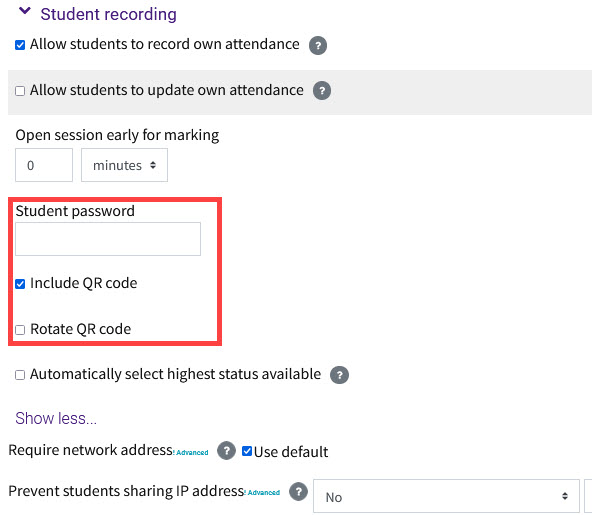
- You can also allow students to record their own attendance, which means that they can manually mark themselves present. To make sure only present students respond to the activity, you have the following options:
- Student password - set a password for the session(s) or check Random password to auto generate a random password for each repeated session. This option can be used in combination with the QR code allowing students to have two options for marking attendance.
- Include QR code - students scan this with their smart phone. This option can be used in combination with the password allowing students two options for marking attendance.
- Rotate QR code - this will create and rotate through QR codes that are only good for 15 seconds. The password is also rotated automatically. Known Issue: this password is not visible to the students and cannot be used as an alternative to the QR code.
- To automatically record "Present" when a student is recording their own attendance, check Automatically select highest status available.

- If you choose to allow students to record their attendance, you will need to share the QR code or password with your students for them to record attendance. The instructor should click the QR icon or key icon to reveal the QR and/or password for students.

- Scanning the QR code will direct students directly to the page to record their attendance and fills in the password for them. To enter a password, students would click into the activity, and next to the date and time click Submit attendance (only visible for open sessions).
- When done, click Add to save your settings.
Editing and Deleting Attendance Sessions
Important: It is recommended to not edit the activity settings after attendance sessions have already run, as grades may disappear from the Attendance report and from the gradebook.
To edit or delete an attendance session, click on the icons in the Actions column. The gear icon brings you to the session settings, and the trash can icon will allow you to delete the session. Only individual sessions can be edited.

Update the settings as needed and click Save changes.
More Resources
For more information on Adding Multiple Attendance Sessions, read the following documentation from Moodle Docs. Note that the documentation does not show the SNAP Theme, but the functionality of the settings is the same. All links will open in a new window.
20360
11/21/2024 4:25:06 PM