USING THE RUN REQUEST SYSTEM
The Run Request system was created to give program users more control and flexibility in running their jobs on the mainframe in a simple, intuitive interface. Jobs that could be easily configured for submission by the user and that didn’t require special facilitation by Production Control were considered for inclusion in the system. Access must be granted by ITS to individual myLSU accounts; contact ITS via the TDX Service Request form with account authorization requests.
The Home Screen
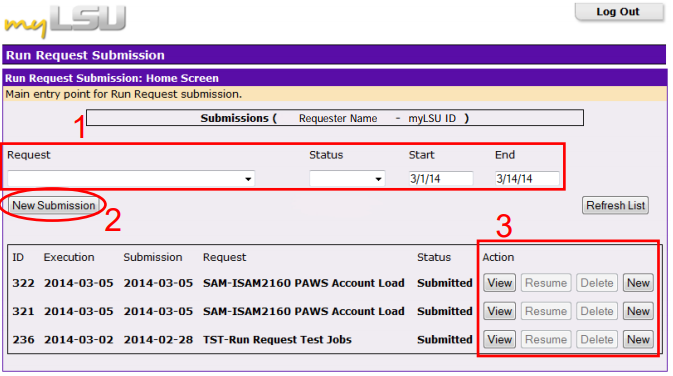
Submitting jobs in Run Request begins at the Home Screen, which can be reached via the Run Request link under the Computing Services tab on the left side of the myLSU home page.From here, submission history can be viewed and sorted and new submissions initiated.
1. The Filter Bar consists of four fields that can be used to sort the submission history in various ways.
2. The NEW SUBMISSION button is used to start the submission process, primarily for requests that do not appear already in the submission history. Requests begun this way will not have any previously used parameters.
3. The Action buttons appear to the right of the submission history entries. These buttons are used to VIEW historical or incomplete requests, RESUME requests that are in process, DELETE canceled requests, or begin NEW requests. Beginning requests with the NEW button will keep the parameter data that was entered for the previous submission, making this a quick and convenient method of repeating identical requests. However, parameters can be easily changed during the submission process if necessary.
Submitting a Request
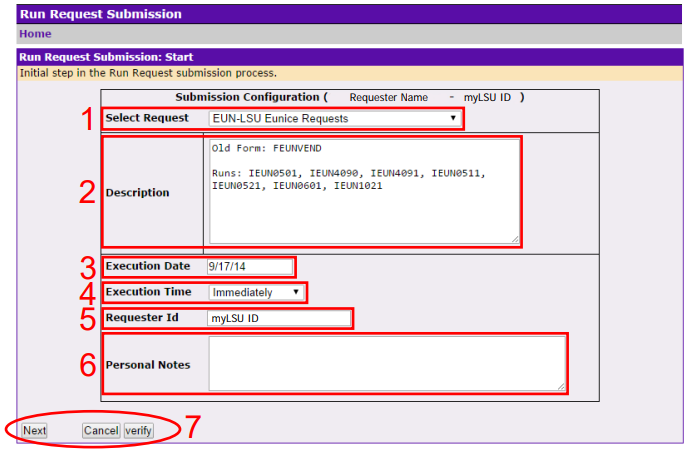
Begin by clicking the NEW SUBMISSION button, which will load the Submission Start panel.
1. Select the desired Request.
2. Confirm that the Description matches the expected request. The old mainframe form and any jobs connected to the request should be listed.
3. Select the Execution Date. The default date is today, but the request can be scheduled for any valid date in the future.
4. Select the Execution Time. Requests can be scheduled to run ASAP or for a particular time. The Execution Time drop-down list contains “ASAP”, “After 5:30 PM”, then times in 30 minute increments listing the PM times first, starting with 12:00 PM and progressing through to 11:30 AM.
5. Confirm that the Requester Id matches the myLSU account of the person submitting the request.
6. Add any optional notes regarding the request. These will be saved and can be helpful for the next time this request is being submitted. Notes can only be seen by the user whose myLSU account submitted the request.
7. Select the appropriate Action button: NEXT to continue, CANCEL to quit and return to the Home screen, or VERIFY to validate the information entered so far.
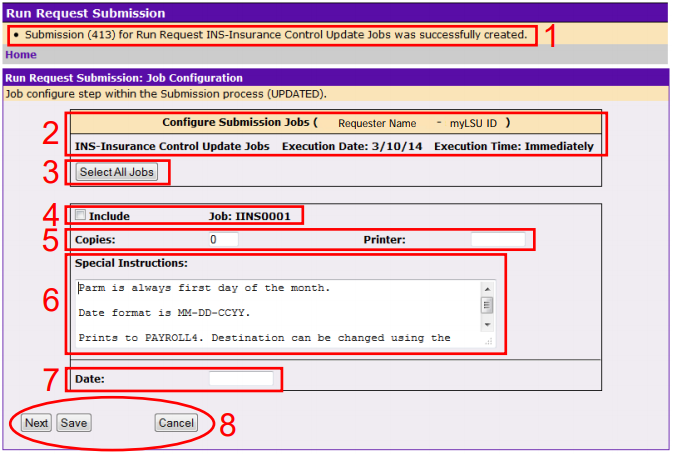
The next step in the submission process is the Job Configuration panel.
1. Messages will be displayed at the top of the page above the Job Configuration panel. Normally, this will be confirmation that the request was successfully created along with its assigned submission ID number, but will also include any error alerts.
2. Listed at the top of the panel is a summary of information entered so far, including Requester ID, the name of the Job Request form, and the assigned date and time for execution.
3. The SELECT ALL button (optional) can be used to mark all jobs listed in the request for execution.
4. Check the Include box for each job to be run. If more than one job is selected, they will be scheduled to run consecutively from top to bottom.
5. The Copies and Printer fields can be used to define an extra number of printouts and to which printer destination they should be sent. (Instructions regarding these fields will appear in the “Special Instructions” window below them.) ITS has tried to make this added flexibility available wherever possible. If it is not available, it may be due to either the sensitive nature of the output or the way the program code is written.
6. Detailed instructions for the job are found in the Special Instructions field. This can include information regarding default output, additional output options, instructions for entering parameter values, scheduling notes, or other important messages.
7. Enter any required data into the Parameter field(s). Hovering the mouse over the field(s) will show additional information, including an example.
8. Select the appropriate Action button: NEXT to continue, CANCEL to quit and return to the Home screen, or SAVE to store all data that has been entered into the request.
Clicking Next will load the Configuration Summary panel.
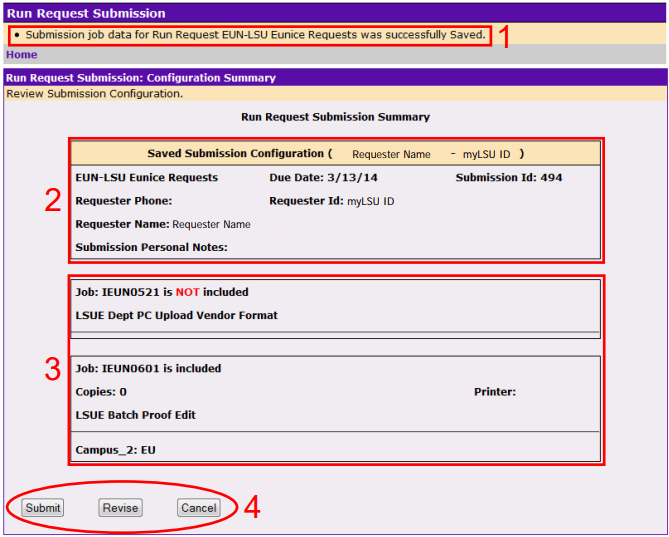
1. A message regarding the status of the request will appear at the top.
2. The top box in the Submission Summary will display the request name, date and ID number, as well as the personal ID information of the requester.
3. The bottom of the Submission Summary lists all jobs on the request form. Jobs not included will be denoted in red. All parameter data will be listed as well. Review carefully before proceeding.
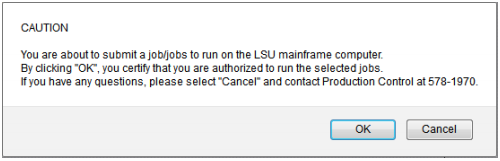
4. Select the appropriate Action button. CANCEL will quit the request and return to the Home screen. REVISE will return to the Submission Start panel, retaining all parameter data but allowing any changes necessary. Clicking SUBMIT will show a pop-up warning. Click OK to process the request on the mainframe.
The final screen in the Run Request process is the Submission Results panel.
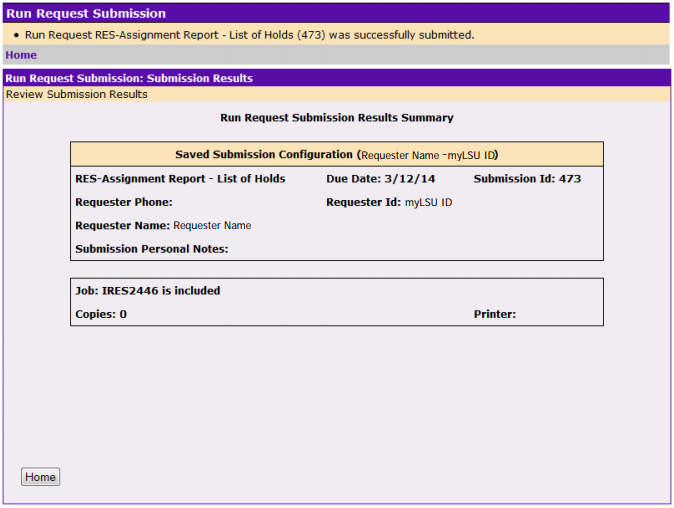
This panel lists a summary of the request information that was submitted. The HOME button closes the submission and returns to the Home screen, where the most recent request will be displayed as the top entry in the user’s submission history.
Run Request is continually being updated; please contact Production Control at 8-1970 with any questions or to inquire about having jobs added to the system.